A Telegram store bot is a Telegram bot that opens a shop: buyers tap it, browse a catalog, pay and get an order confirmation without leaving the chat. To set one up you need four things: a bot that buyers open, a catalog, a way to take payment, and a place where new orders reach you. With Tiny Shops all four are set up from one dashboard without code, and the store opens inside Telegram as a Mini App. This guide is the full launch checklist, in order, with a screenshot of every screen: what to decide first, the five signup steps, the dashboard settings with their exact labels, how to test the store before buyers see it, and how to get the first orders.
If you only need the bot itself, start with how to make a Telegram bot in BotFather and come back here.
What you are building#
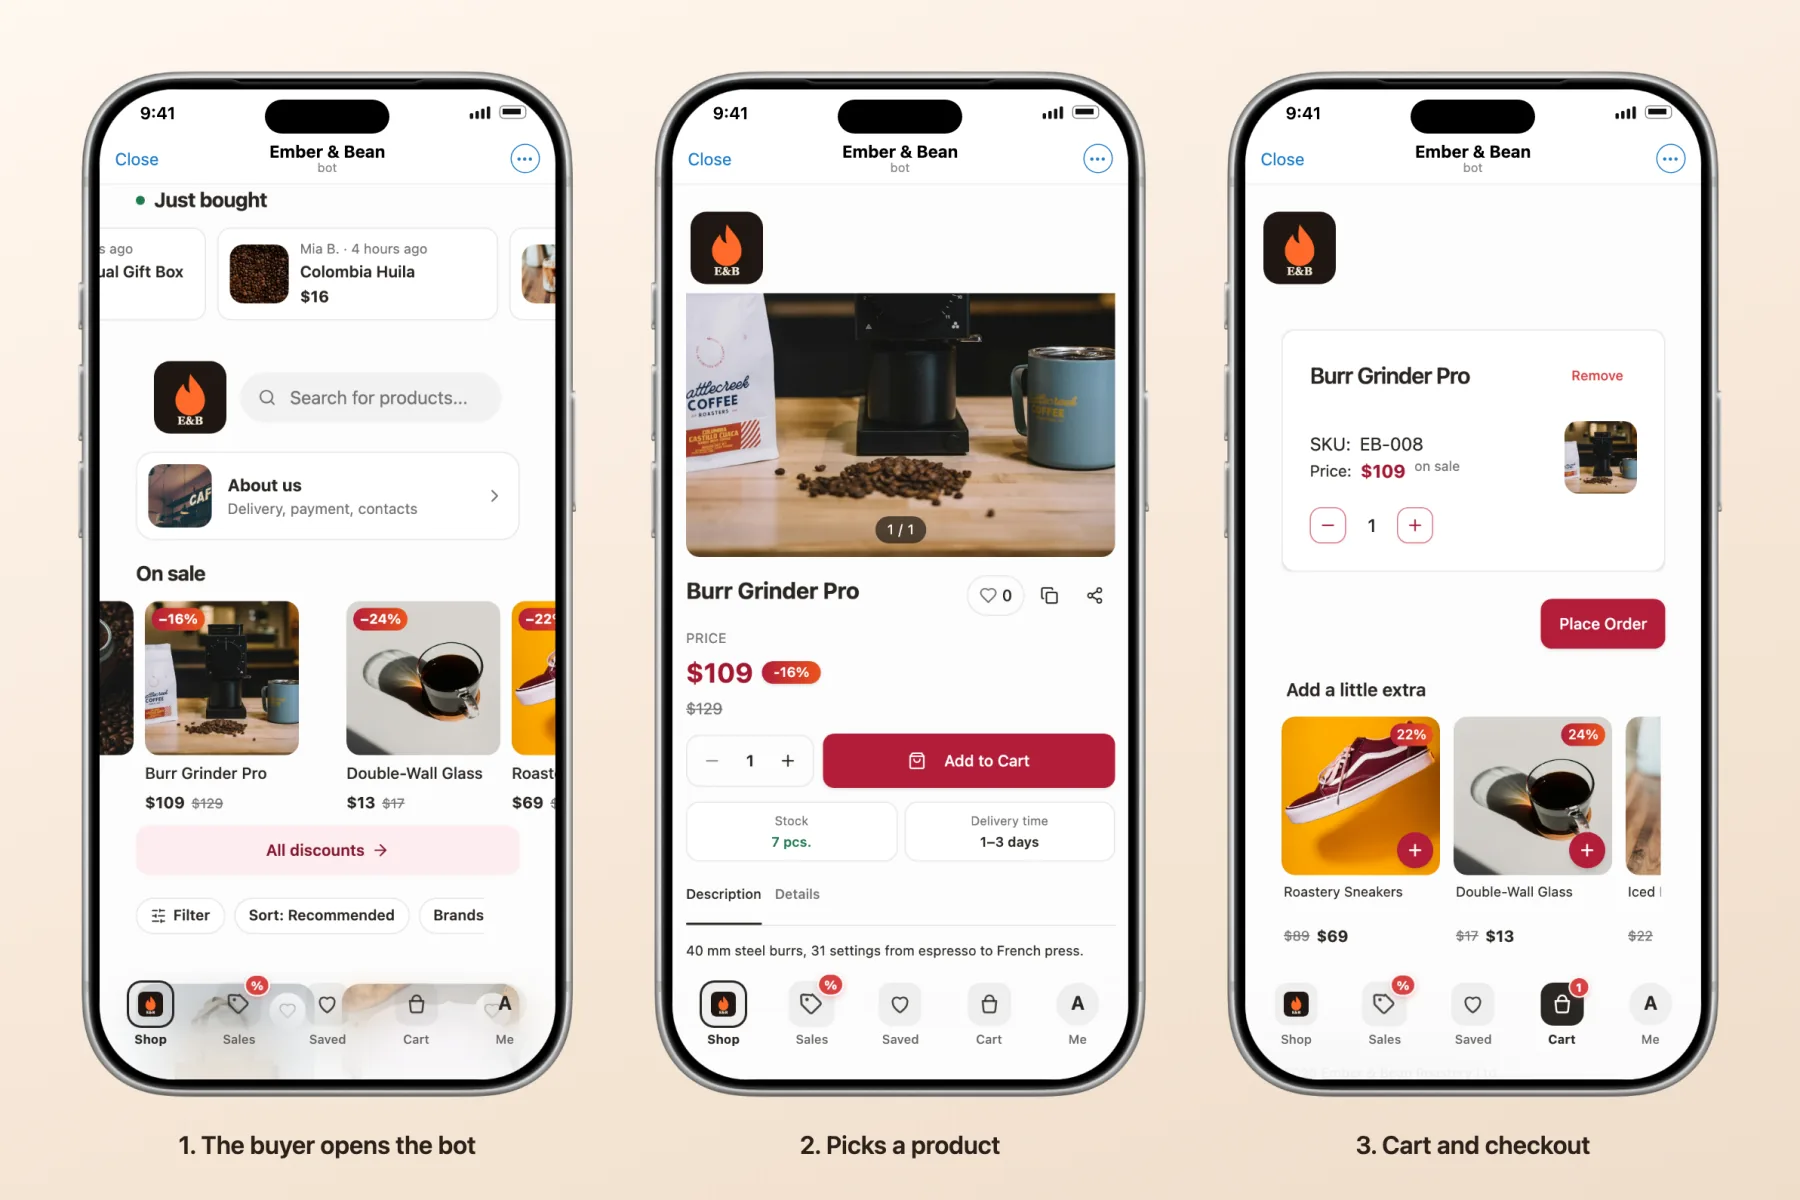
The buyer taps your bot's Open Shop button, and the store opens inside Telegram: a home page with your products, a product page with Add to Cart, then the cart and checkout. The buyer never leaves the chat, and the new order lands in your dashboard and in your Telegram.
Decide three things first#
| Decision | Options | How to choose |
|---|---|---|
| Where you sell | A Mini App storefront, or selling in your Telegram chats | A storefront fits a catalog with a cart and checkout. Chat selling fits made-to-order work and paid photos or videos for Stars. |
| How buyers pay | No online payment, Telegram Stars, card (Stripe), local payments in Southeast Asia, and other gateways | No online payment is the fastest start: buyers order, you agree on payment and mark the order paid. Card and Stars charge at checkout. |
| Where products live | The dashboard, or a Google Sheet | This is a one-time choice. A sheet suits a catalog you already keep in a spreadsheet. |
What you need#
- A Telegram account. It is also your login to the dashboard.
- A few products with a photo, a name and a price.
- A bot. You can make one in BotFather, or let Telegram create it for you during setup.
- A payment card for the plan. Nothing is charged today; the percent is billed only after your first $100 in sales.
- For card payments from buyers: a Stripe account. You can launch without it and connect it later.
How to set up a Telegram store bot in Tiny Shops#
1. Create the store (five steps, about two minutes)#
- Go to tiny-shops.com, press Start Free, then Continue with Telegram.
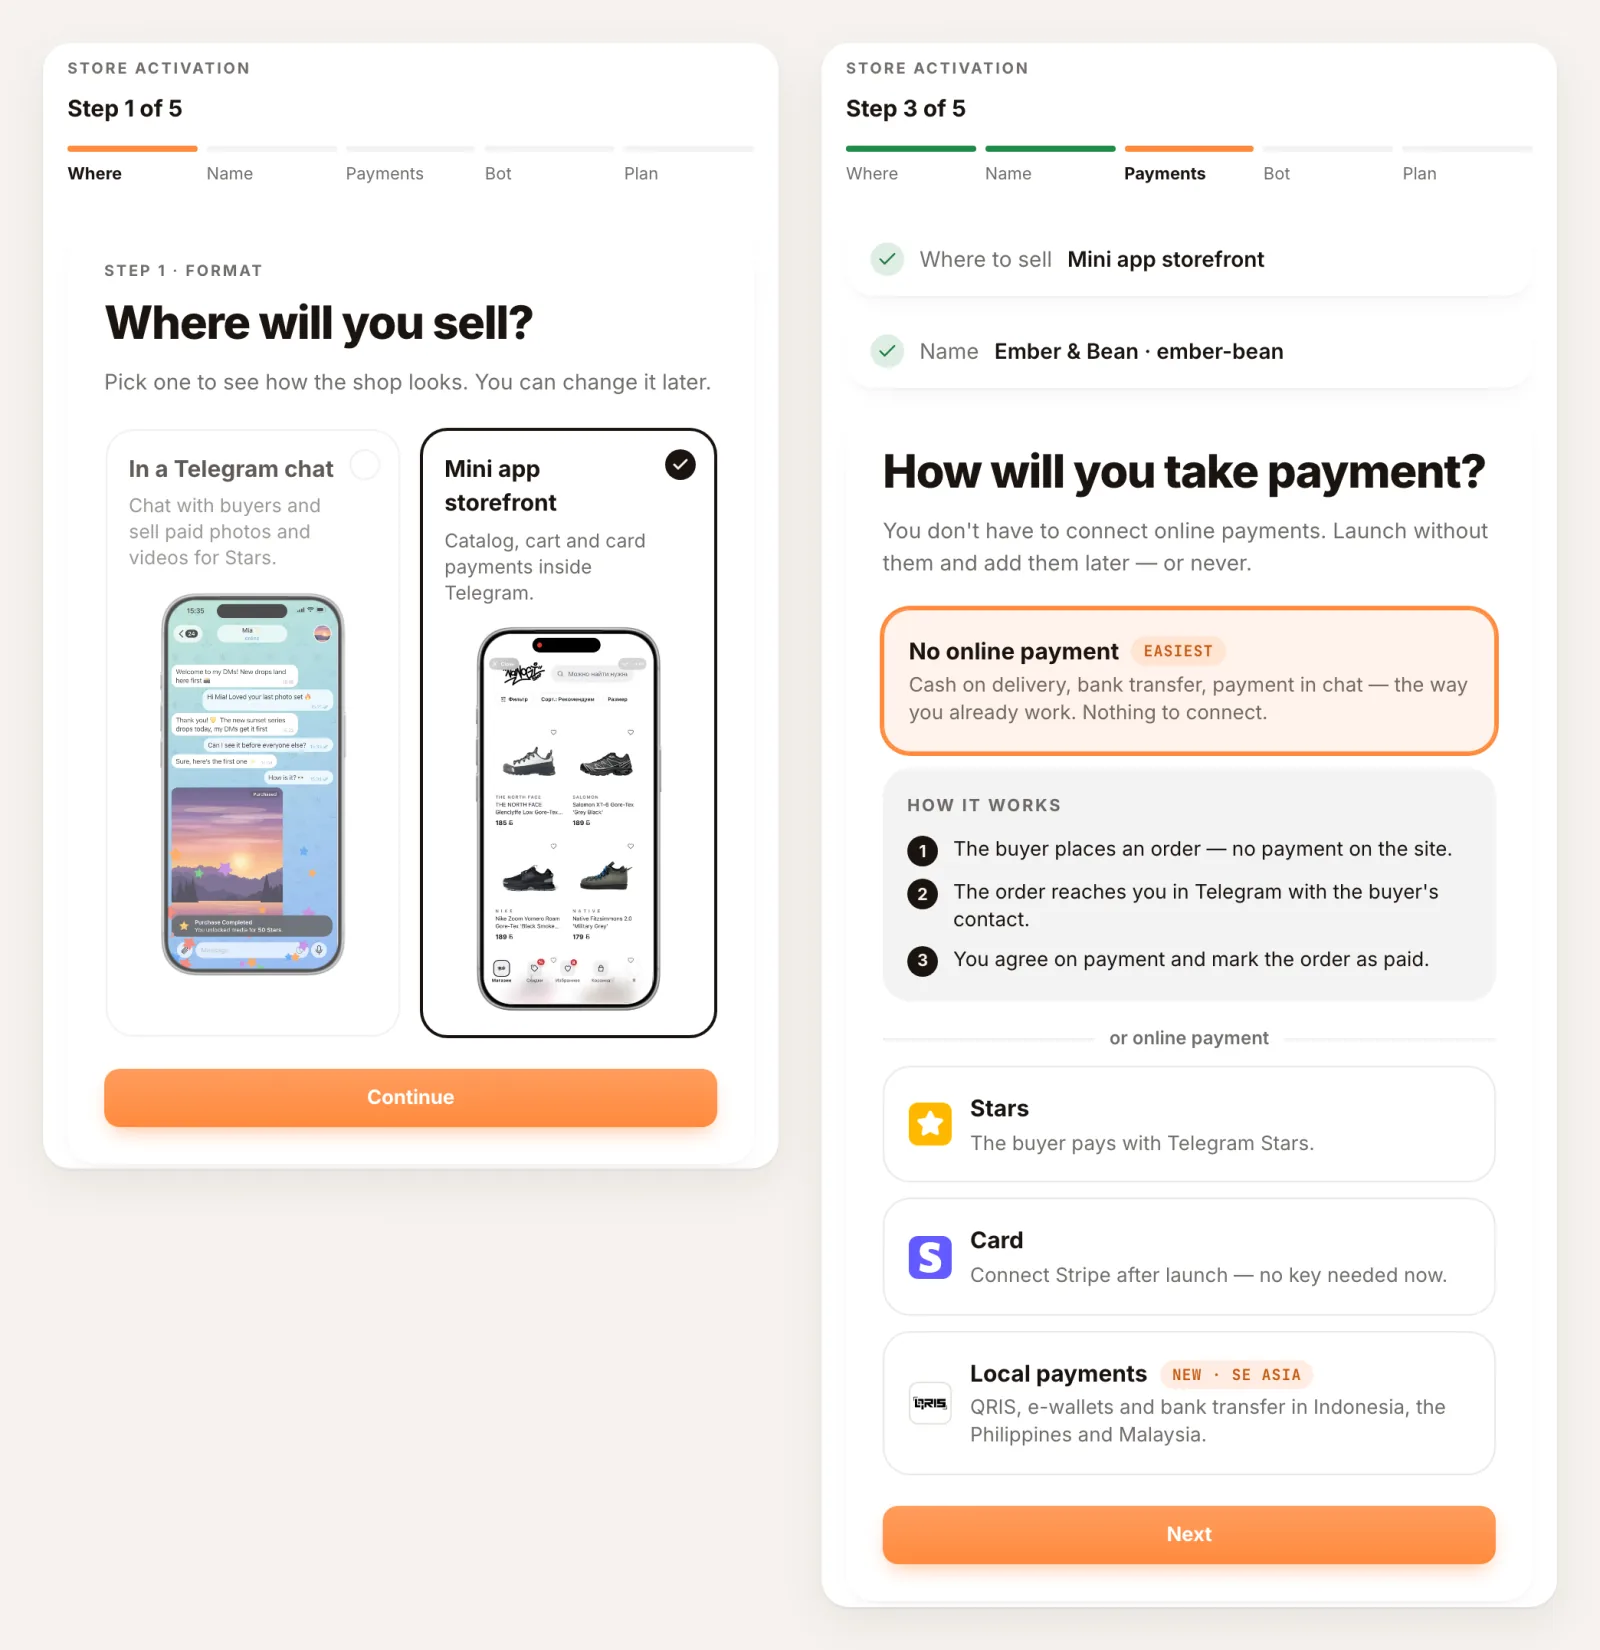
- Where will you sell? For a catalog with a cart, pick Mini app storefront. In a Telegram chat is the other format, for selling paid photos and videos in your chats. You can change it later.
- What is the shop called? Buyers see this name, and the store address is built from it: Ember & Bean becomes
ember-bean.tiny-shops.com. Press Next. - How will you take payment? Pick one; you can add more later:
- No online payment (marked Easiest): the buyer places an order without paying, the order reaches you in Telegram with the buyer's contact, and you agree on payment and mark the order paid. Cash on delivery and bank transfers work this way.
- Stars: the buyer pays with Telegram Stars.
- Card: you connect Stripe after launch, so no key is needed now.
- Local payments: QRIS, e-wallets and bank transfer in Indonesia, the Philippines and Malaysia.
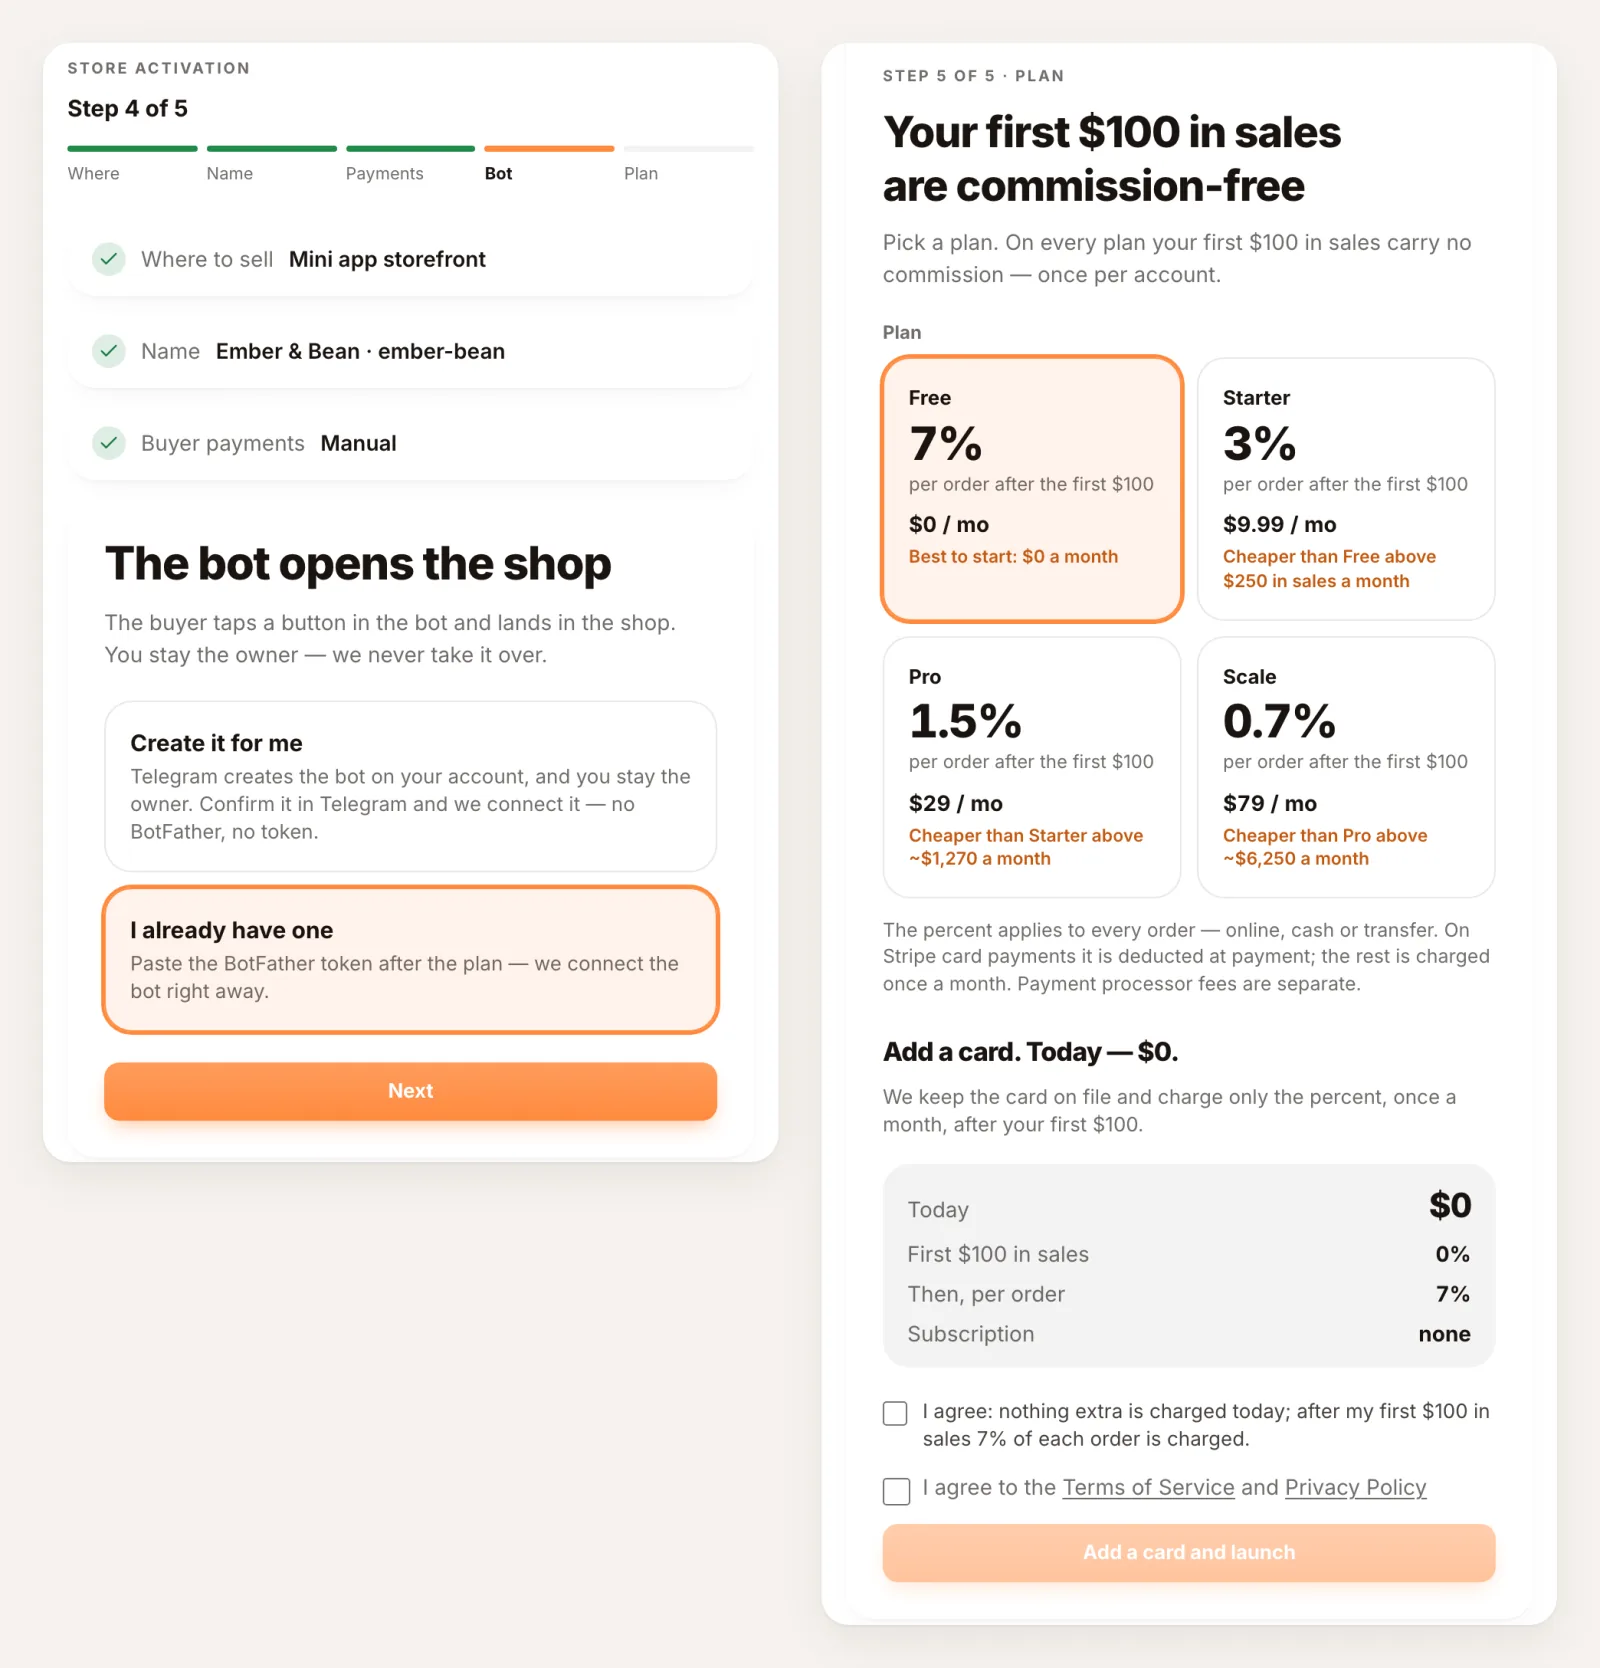
The bot step. Pick Create it for me and Telegram creates the bot on your account: you confirm it in Telegram, and there is no BotFather and no token. Or pick I already have one and paste the BotFather token right after the plan step. Making the bot yourself is covered in how to make a Telegram bot.
The plan step. Choose Free, Starter, Pro or Scale; the cards show the percent per order and the monthly price, and when a bigger plan becomes cheaper. On every plan your account's first $100 in sales carry no commission, once. Add a card (today's charge is $0), tick the two agreement boxes and press Add a card and launch.
Once the bot is connected, Tiny Shops sets the bot's Open Shop menu button and its commands, so buyers can open the store right away.
2. Add your first product#
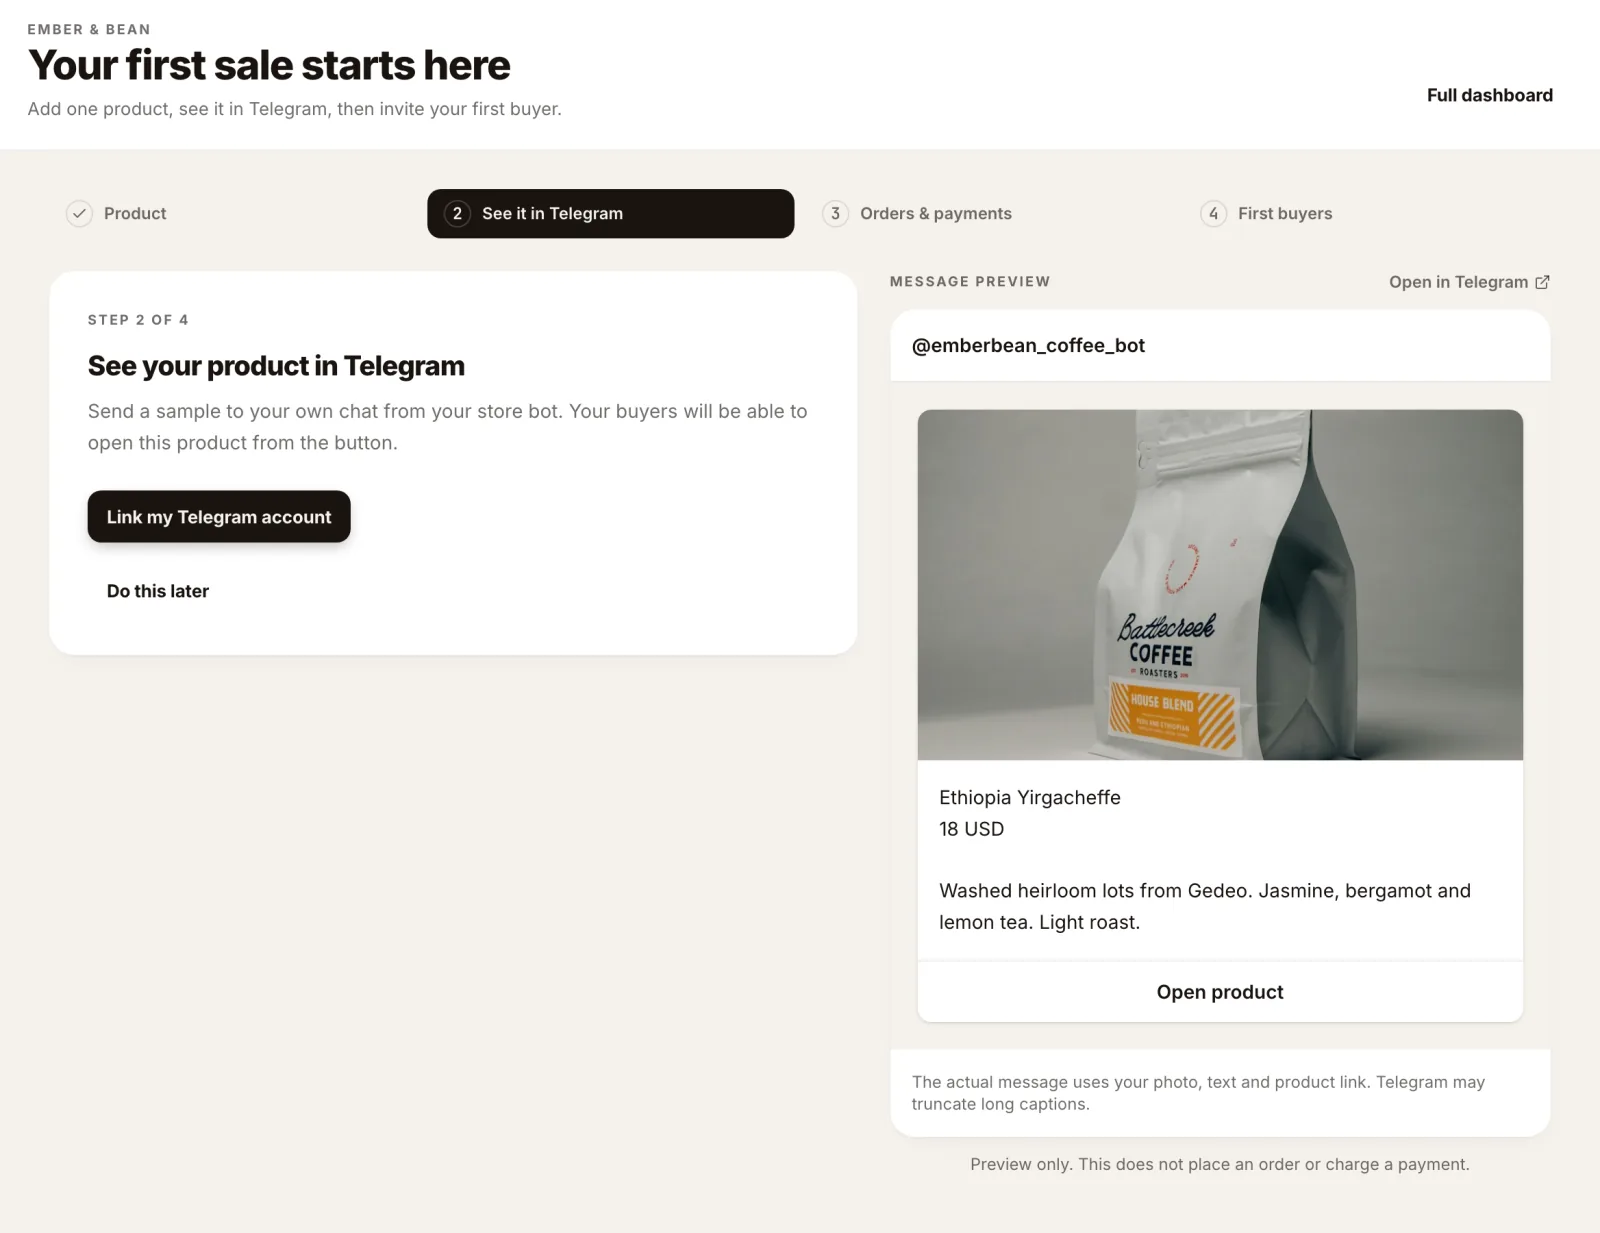
The dashboard opens on Your first sale starts here, a four-step panel: Product, See it in Telegram, Orders & payments and First buyers. The first step adds a product with a photo, a name and a price, and sets the store currency. The second one sends that product to your own chat with the bot, exactly as a buyer will see it: press Link my Telegram account once, and the preview on the right shows the message you will get. Full dashboard (top right) leaves the panel; you can come back to it until your first order.
For the rest of the catalog:
- Open Products. The first time, Choose Product Management Method: Use Database to manage products in the dashboard, or Google Sheets to sync them from a sheet.
- Press Add Product.
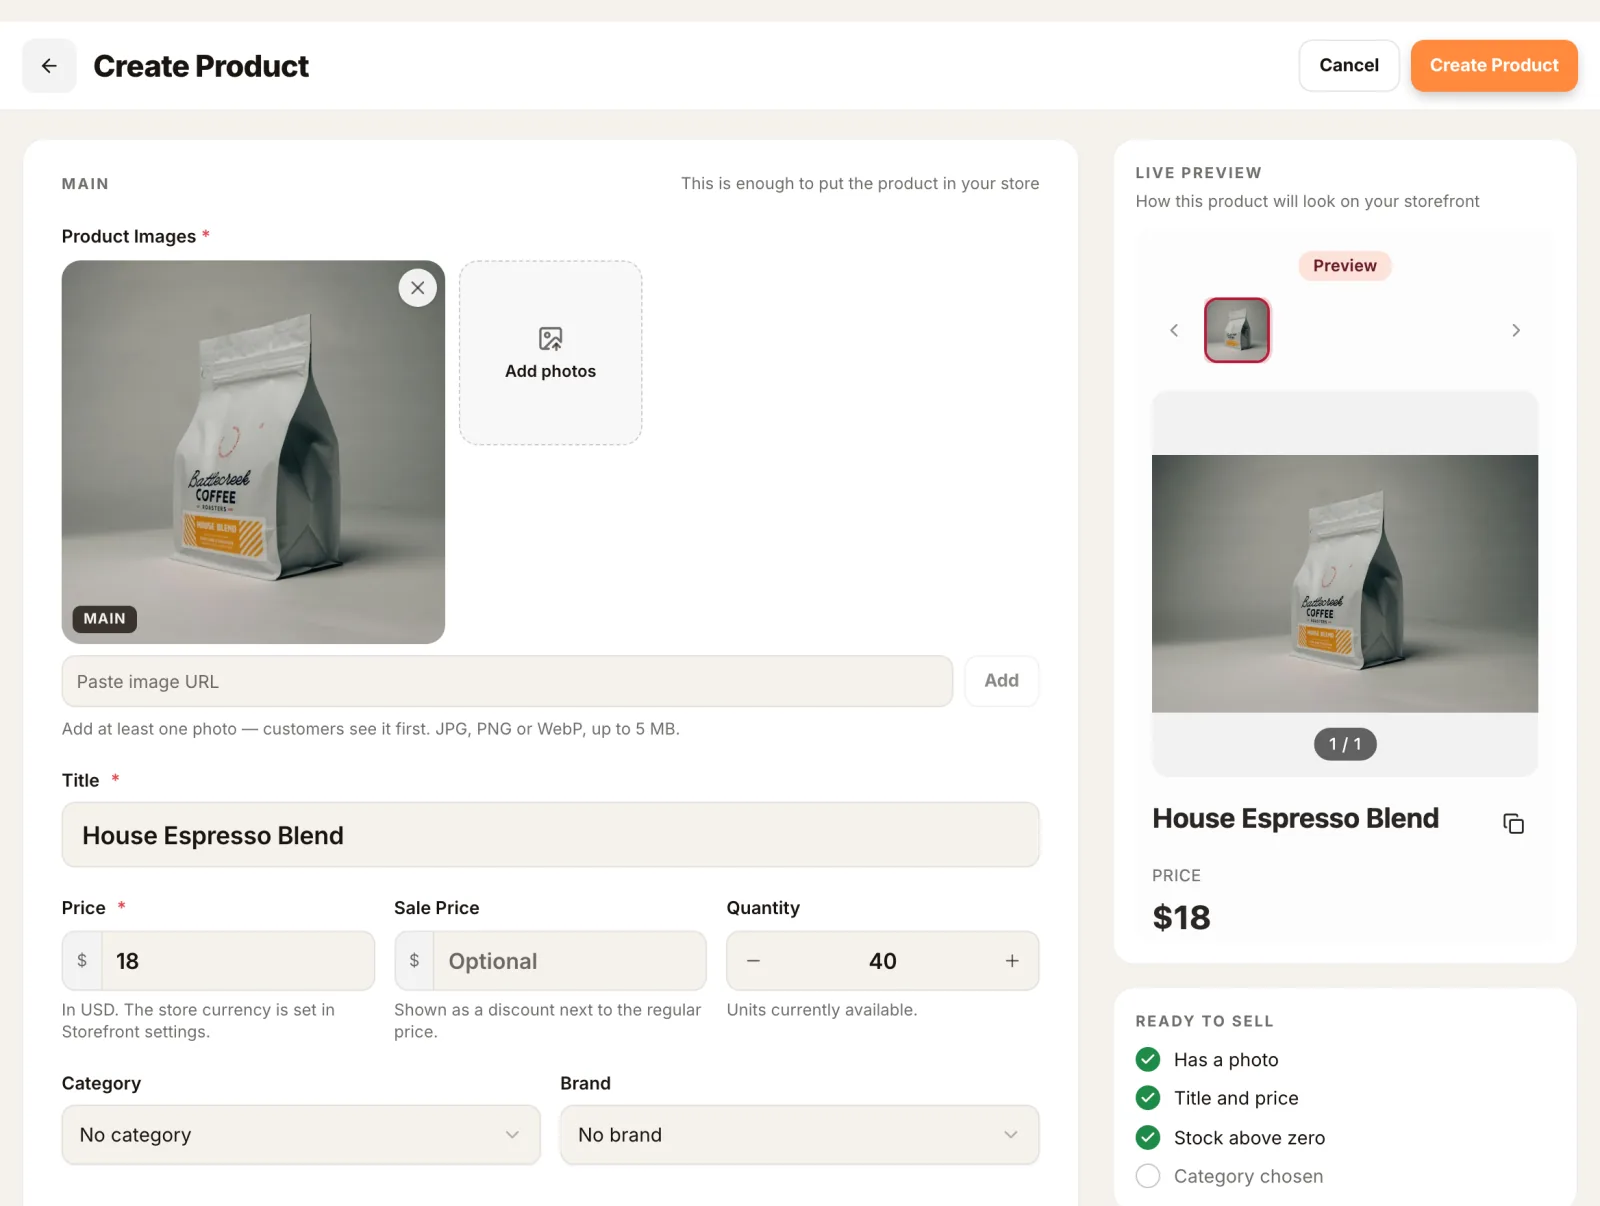
- Under Product Images, upload at least one photo (JPG, PNG or WebP, up to 5 MB) or paste an image link into Paste image URL and press Add. The first photo is the main one.
- Fill in Title and Price. A Sale Price shows as a discount next to the regular price, and Quantity is the number of units in stock.
- Optional: Category, Brand, a description, and under How it sells choose One item, By size (each size with its own stock) or Variants such as color, each with its own price.
- Watch the right column: Live preview shows the product as buyers will see it, and Ready to sell ticks off a photo, the title and price, stock above zero and a category.
- Press Create Product.
On Pro and Scale you can also send Nano, the dashboard assistant, a CSV file or a pasted product list and it creates the catalog for you.
3. Set the currency and payment methods#
- Open Checkout form → Payment methods. The card at the top, Prices and checkout in USD (or your currency), is the store currency. Changing it updates all product prices to the new currency.
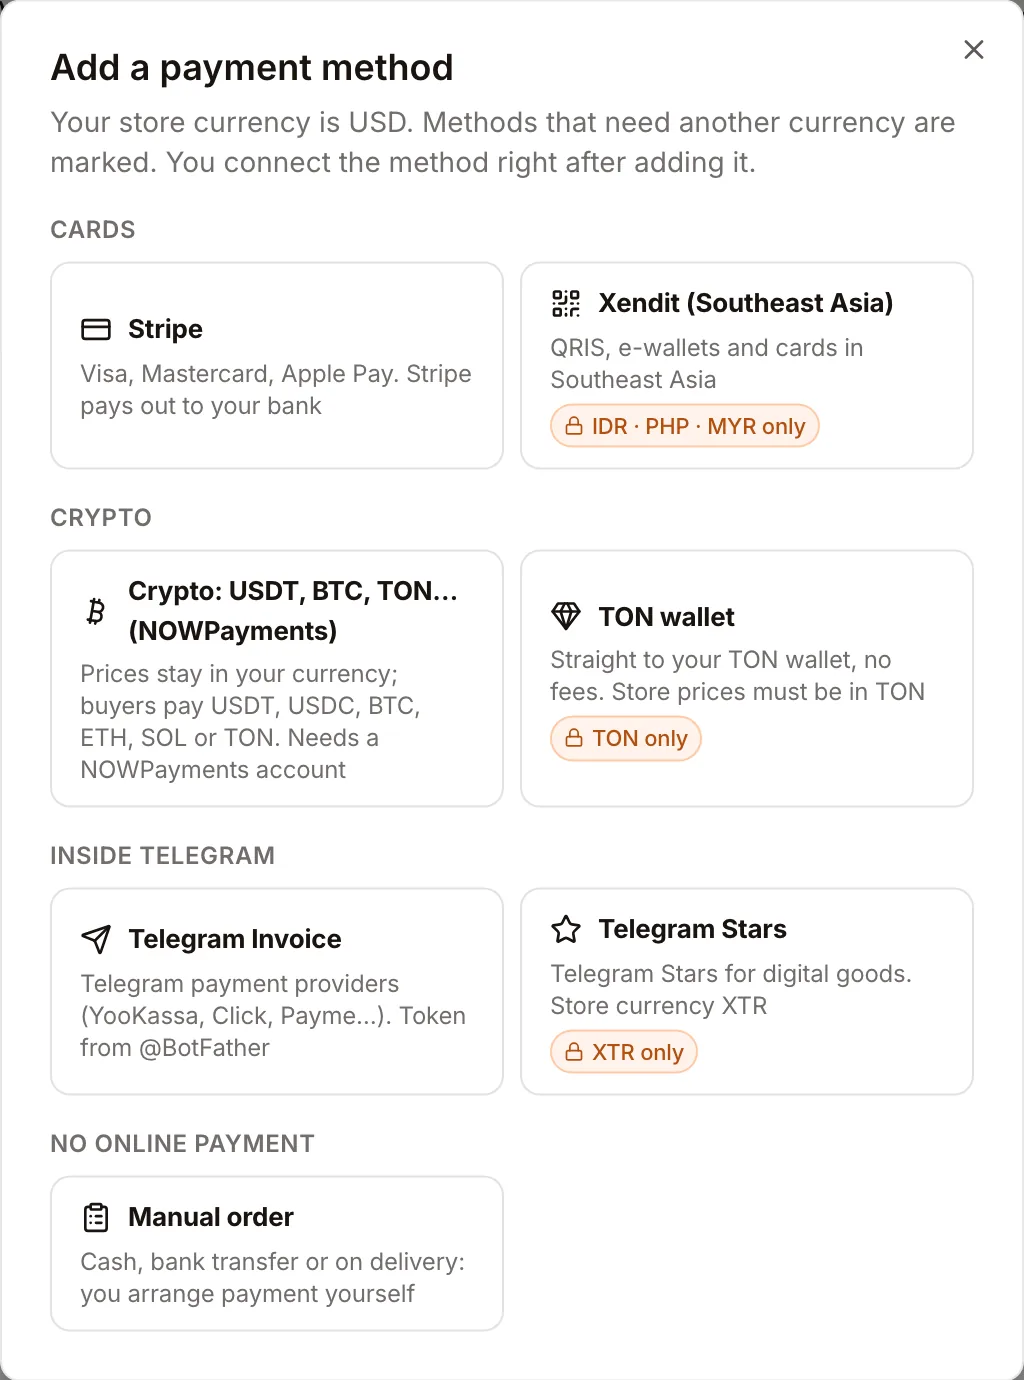
- Press Add method. The Add a payment method window groups the options: Cards (Stripe, Xendit (Southeast Asia)), Crypto (NOWPayments for USDT, USDC, BTC, ETH, SOL or TON, and a TON wallet), Inside Telegram (Telegram Invoice for providers connected through BotFather, and Telegram Stars) and No online payment (Manual order). A method that needs another currency is marked, for example XTR only for Stars and TON only for the TON wallet.
- For cards, add Stripe and finish Stripe's onboarding. Once Stripe is connected, cards become the only way to pay in that shop, and the other methods turn off.
- For Manual order, set up the Payment screens the buyer sees after ordering: start from a template (Card transfer, Crypto, Transfer by phone, PayPal / Wise) and add fields to copy, text, a picture or QR code, or a link. The phone preview on the right shows the result, down to the I have paid — place the order button.
- Press Save changes (top right) to publish the method list to your storefront.
- The Delivery tab of the same page holds your delivery options.
Which method fits which market, and how to connect each one: how to connect payments to a Telegram shop.
4. Get order alerts#
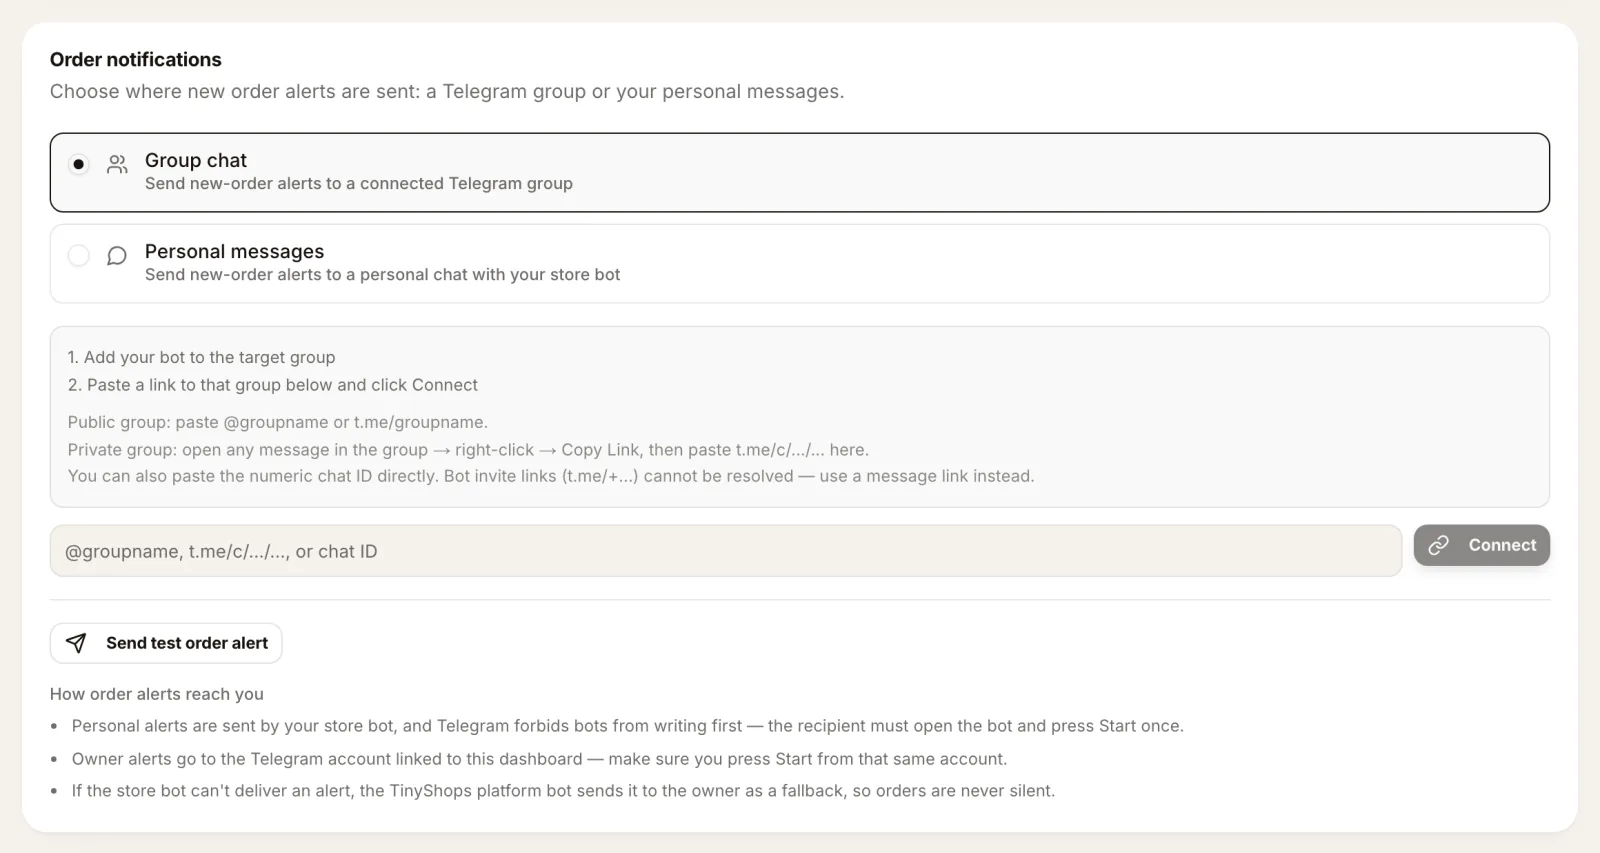
Open Telegram bot → Notifications and scroll to Order notifications:
- Group chat sends every new order to a Telegram group, so the whole team sees it. Add your bot to the group, paste the group's link (
@groupnameort.me/groupnamefor a public group; for a private one, a message linkt.me/c/…or the numeric chat ID) and press Connect. Invite links (t.me/+…) don't work here. - Personal messages sends alerts to your own chat with the store bot.
Press Send test order alert to check the route. Telegram doesn't let bots write first, so whoever gets personal alerts must open the bot and press Start once, from the Telegram account linked to the dashboard. If the store bot still can't deliver an alert, the Tiny Shops platform bot sends it to you instead, so an order is never silent. Every order also appears in Orders.
The same tab holds the Weekly report: once a week the bot sends you a card with your revenue, orders and best seller.
5. Write the welcome message#
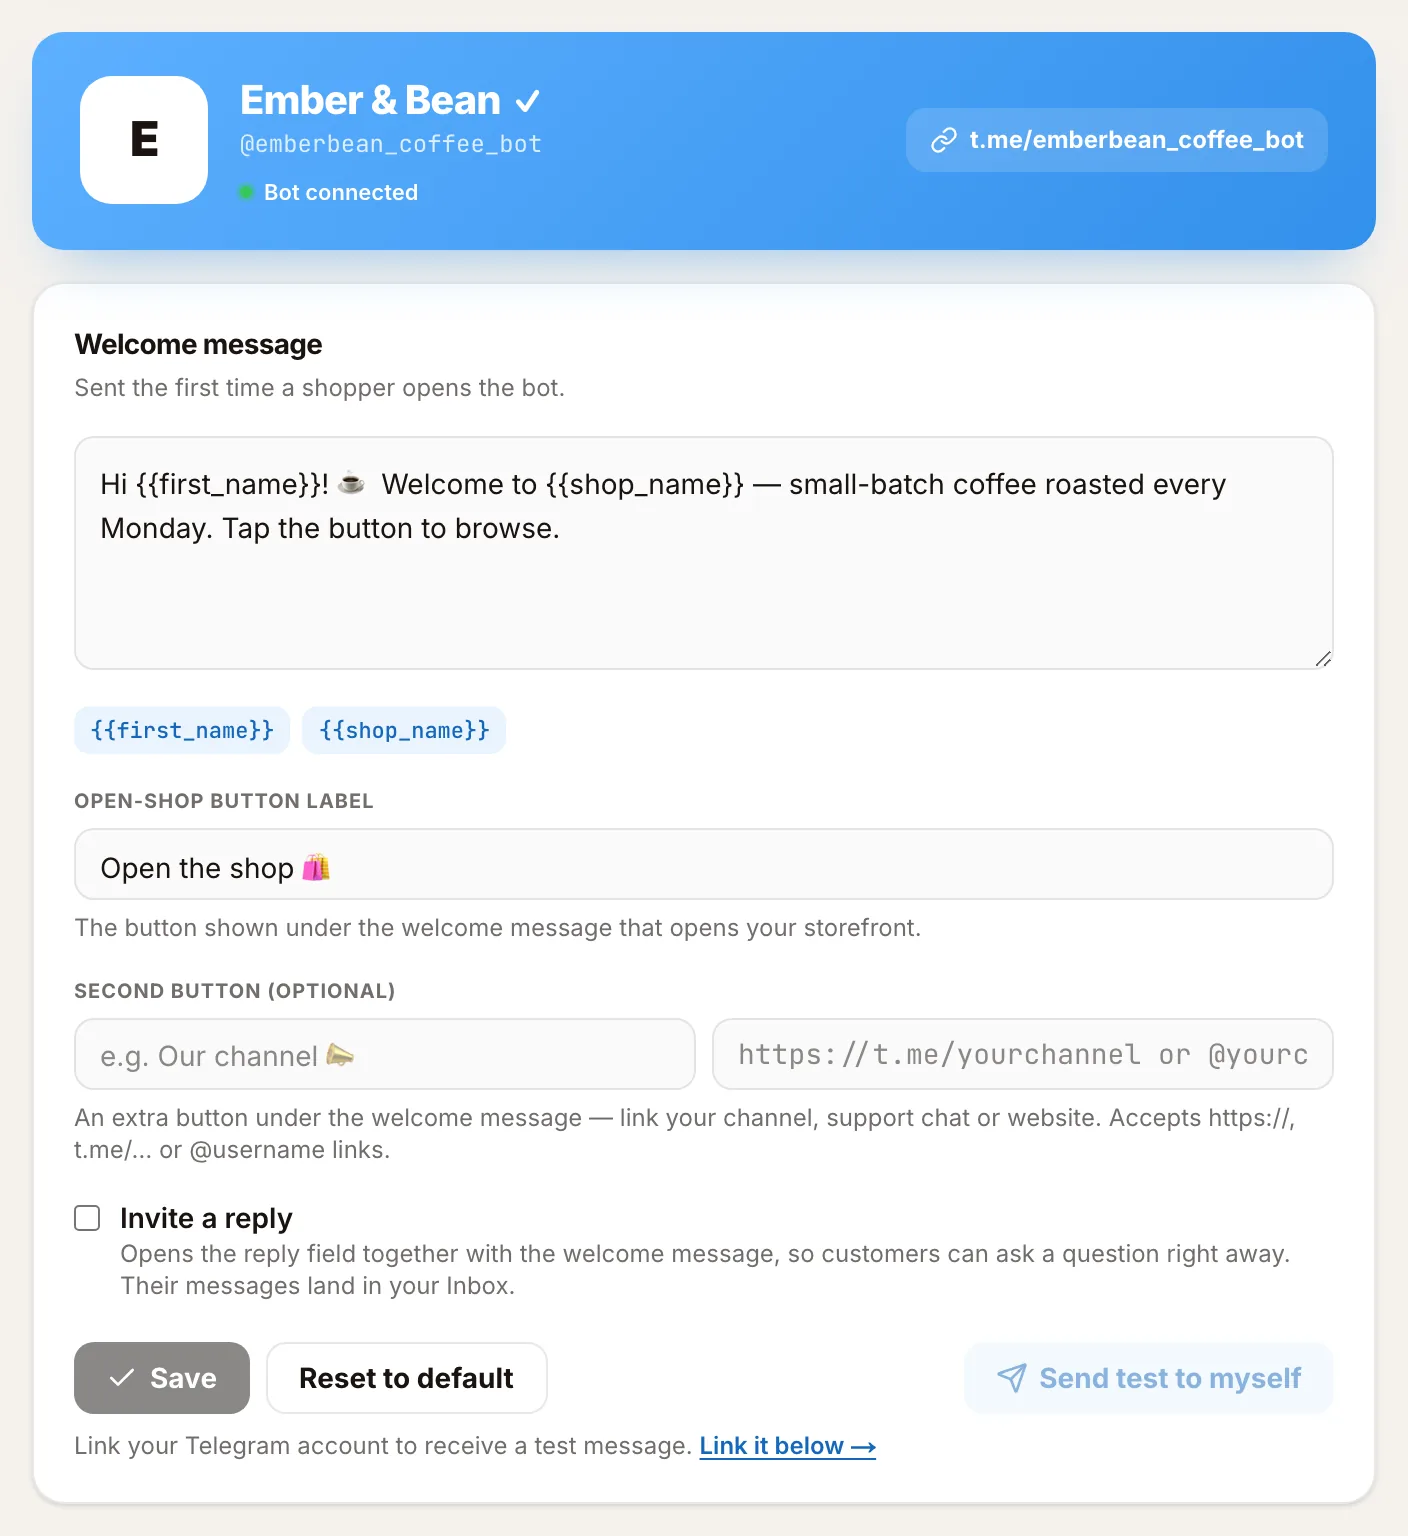
In Telegram bot → General, the blue card confirms the bot is connected and shows its link (t.me/yourbot). Below it:
- Welcome message is what a buyer gets the first time they open the bot. Insert
{{first_name}}and{{shop_name}}to greet each buyer by name. - Open-shop button label is the text of the button under the message that opens your store, for example Open the shop 🛍️.
- Second button (optional) adds one more button: your channel, a support chat or a website.
- Invite a reply opens the reply field with the welcome message, so buyers can ask a question right away; their messages land in your inbox.
- Press Save, then Send test to myself to see the message in Telegram.
6. Make it look like your brand#
In Storefront Settings, upload your Shop Logo, set the Storefront Language, and adjust colors, fonts and corners on the Appearance tab.
7. Turn on cashback (optional)#
Open Cashback, switch on Enable cashback, and add Tiers by order number: for example 3% for orders 1–4 and 5% from the fifth order. Buyers spend the bonuses on their next order. Cashback and Promo Codes are on every plan. How to run it well: how to run cashback promotions in Telegram.
Test the store before you share it#
- In the first-sale panel, open See it in Telegram, link your Telegram account and press Send to myself. You get the product in your chat with the bot, with a button that opens it. If nothing arrives, open your bot and press Start first.
- Open your bot, tap Open Shop, add a product to the cart and place an order.
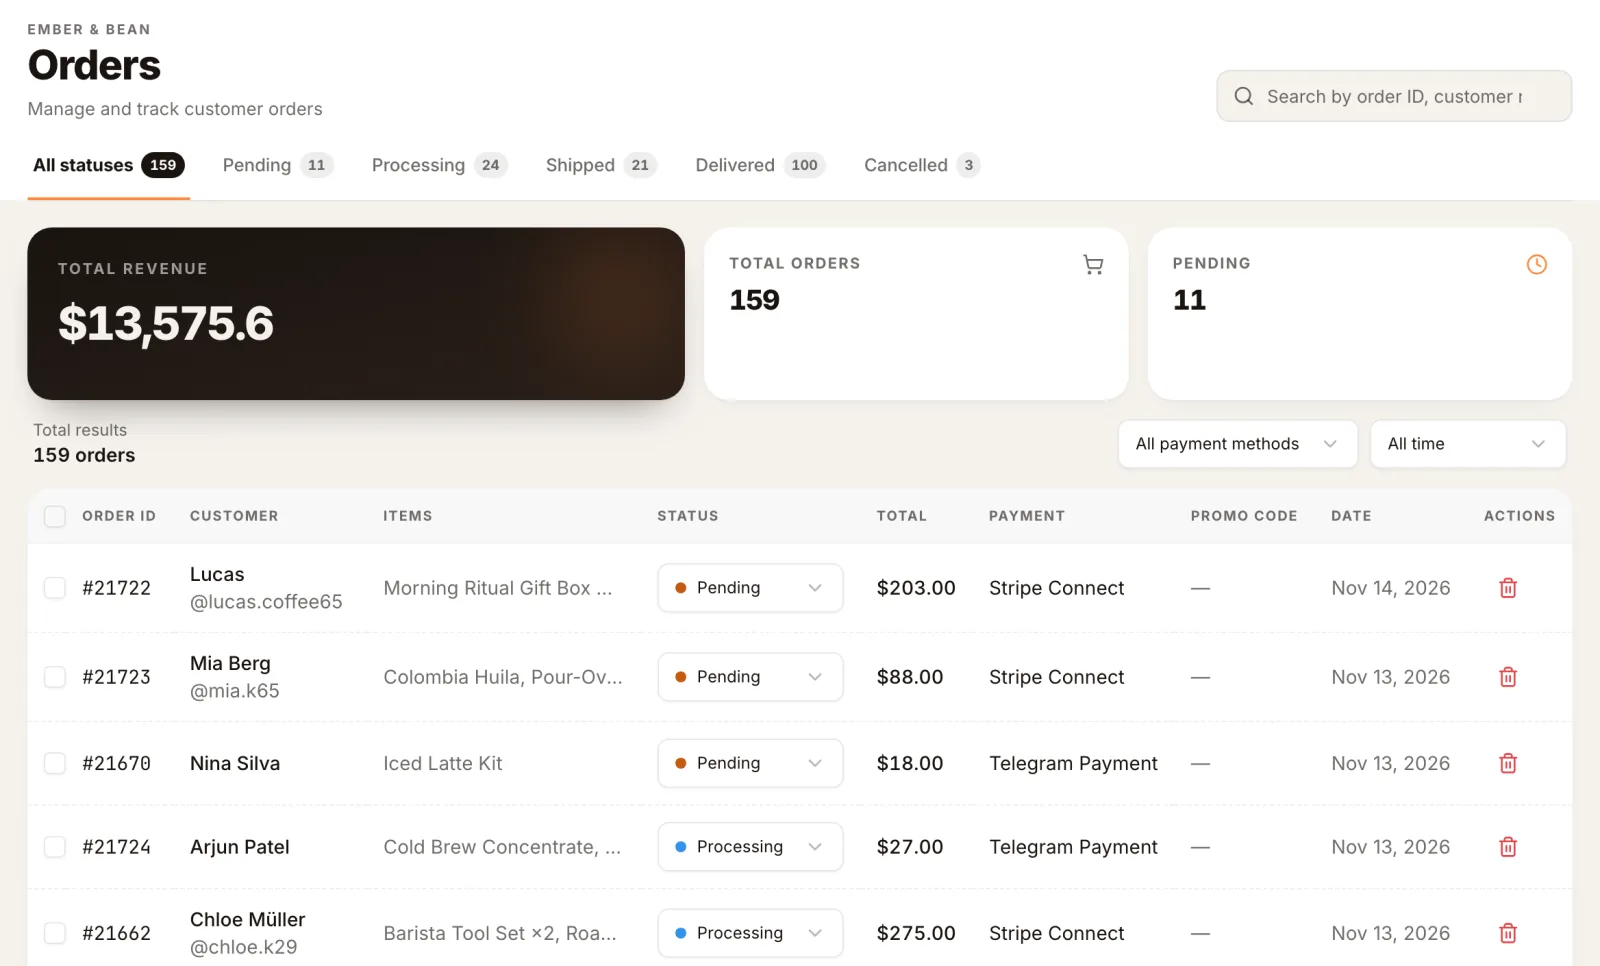
- Open Orders: the new order is at the top with its status, total and payment method, and the tabs filter by status (Pending, Processing, Shipped, Delivered, Cancelled). Check that the alert reached you too.
- With card payments, run Try card checkout first: a test payment with Stripe's test card, visible only to you.
Get your first buyers#
- Send the bot link to people who already know you. Your link is
t.me/plus your bot's username. Friends and past customers place the first orders. - Pin the link in your channel, and add it to your Telegram bio.
- Welcome new members of your group or channel. Under Telegram bot → Channel, the bot can greet each new member with a post that opens your shop; only the new member sees it.
- Send a broadcast. Everyone who started your bot can get a message with a product card and a Buy button. Free includes 3 broadcasts a month.
What to measure in the first weeks#
- Orders and revenue on the dashboard.
- Where buyers stop: many visitors and few orders usually means missing photos, unclear prices or no payment method that suits them.
- Repeat buyers in Customers: each buyer's order history shows who came back.
For the full picture, see ecommerce analytics for a Telegram shop.
What it costs#
| Plan | Per month | Percent of each order | Broadcasts a month |
|---|---|---|---|
| Free | $0 | 7% | 3 |
| Starter | $9.99 | 3% | 10 |
| Pro | $29 | 1.5% | 25 |
| Scale | $79 | 0.7% | Unlimited |
Your account's first $100 in sales are commission-free once, not every month, on any plan. Telegram Stars sales pay the percent from the first sale. Payment providers charge their own fees on top. More on the pricing page.
Limits to know#
- One store, one bot: a bot connected to one store can't be connected to another.
- Free and Starter include 1 store, Pro up to 3, Scale up to 10. See how to run multiple Telegram shops.
- Buyers who open the store in a browser can sign in only after you send
/setdomainto BotFather once; inside Telegram it works without that step. - Your own domain (shop.yourbrand.com) is on Pro and Scale: how to add a custom domain to your Telegram shop.
FAQ#
What is a Telegram store bot? A bot that opens a shop inside Telegram: a catalog, a cart and checkout as a Mini App, plus order messages in the chat. BotFather gives you the bot; a store builder such as Tiny Shops turns it into the store.
How long does it take to set up a Telegram store bot? Creating the store and connecting the bot takes a few minutes. Most of the time goes into product photos and descriptions.
Do I need a website to sell on Telegram? No. The store opens inside Telegram as a Mini App. It also has its own web address, so you can share it outside Telegram too. To compare a store with selling in groups, channels and chats, see how to sell on Telegram.
Can I set up a Telegram store for free? Yes. The Free plan is $0 a month with unlimited products; it asks for a card at signup and charges $0 today; your account's first $100 in sales pay no commission, then each order pays 7%.
Which is better: a Telegram store or a Telegram channel? They do different jobs. A channel builds an audience; a store takes orders. Most sellers use both and link the store from the channel. For the bigger picture, see how Telegram ecommerce works, and to compare tools, how to choose a Telegram store builder.
Can I sell digital products? Yes. Stars are made for digital goods, and chat selling lets you send paid photos and videos for Stars. For what fits best, see how to sell content on Telegram.
Set up your Telegram store at tiny-shops.com →
